
Visual Air Barrier Testing
Air flow through building enclosures is supposed to be controlled. It typically follows that all exterior assemblies such as walls, roofs, and transitions need to be practically airtight, with exception of dedicated air vents. Lack of air tightness often may indicate other deficiencies: water leaks, water vapor convection, transmission of odors, insects, insufficient noise resistance, etc.
Air tightness verification requires two things: the differential air pressure and a tracer. The former is a prerequisite, and is unfortunately the most difficult to accomplish in field testing. We generate it by installing door fans, switching AC fans, and scaling down to specific location by building pressurized chambers, and sometimes, if we are lucky we got wind from just the right direction. The trace can be heat, smoke, trace gas, etc.
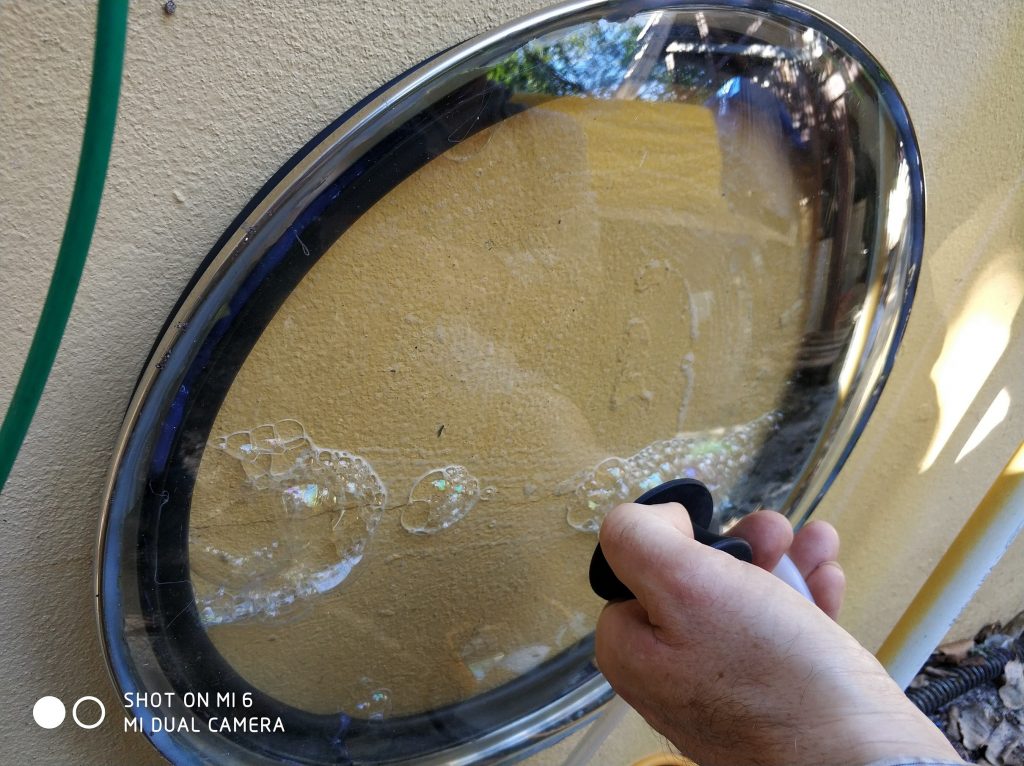
Beauty of the “Bubble Gun” test is that it’s portable, with the equipment very small, fitting the average carry-on case. The chamber is typically a small cone or dome made of transparent material (Some pros use acrylic or polycarbonate domes, I use a glass lid stolen from our kitchen, don’t tell my wife, she is still looking for it.) fit with a perimeter gasket, and a micromanometer gauge. The tracer is any sufficiently viscous liquid, preferably easily washable and compatible with the materials of the facade, such as soap water or dishwasher fluid (I happen to use a dedicated concentrated bubble solution).
Its testing procedure and equipment is described in ASTM E1186, among other things. After the chamber is sealed to the wall, air is pulled slowly enough to prevent bubbles from breaking (at the maximum rate 25Pa/sec). This kind of a very low vacuum is best controlled by slowly sucking air with one’s own lungs, but in the 21st century we use a portable vacuum pump. The rate of the vacuum buildup is controlled with a valve and a watch (there is also the bubble gun on the market with electronic controls, which is a nice tool, but seems to be an overkill for such a simple function). Soap water is spread on the wall in such a way as to not introduce any bubbles, but I haven’t found any better way for it than by a brush application, which always leaves some surface bubbles.
First bubbles are infused gases released from the thick soap solution, (just as they show up in a laminating resin when the vacuum is pulled) which we disregard, then the wall starts responding by releasing air through voids and imperfections. These bubbles are much larger and keep coming as the pressure is pulled, so it’s easy to tell them apart.
We mark these bubbles and we are done. It’s a practical “show and tell” test; the wall either passed or not. There is no way to measure the air tightness, because the allowable air flow would be below threshold of any gauge that I know about. If there is a bubble, it is reasonable to assume that the material/system would leak in excess of the 0.0004/0.004 cfm/ft2 thresholds.
Challenges. The testing is used to assess only the typical flat surface, as opposed to e.g. material transitions. The most typical testing cases would be a liquid-applied WRB, and these are often installed on very rough surfaces, which may successfully resist sealing the chamber’s perimeter, which in turn may need to be additionally sealed with some goop (e.g. chewing gum) or several additional hands pressing the perimeter gasket.
Practical considerations: The chamber is pressed against the wall by squeezing of the thick and very elastic perimeter gasket in order to seal the chamber to the wall. Any reversal of such a movement introduces large and abrupt pressure variations. Therefore, one needs to be careful not to accidentally release the chamber, as the vacuum increase caused by even a minute drop of hand pressure is far in excess of the standard-prescribed 25Pa/sec threshold, and may cause breaking of bubbles. Fortunately, the test can be repeated ad-infinitum.
Air pressures. Most barriers are rated at 75 Pa ( 1.57 psf ) which is useful for comparison among different materials and assemblies, but not so useful in individual cases. The typical wind pressures for low and mid rise buildings fall somewhere in 40 psf (1,915 Pa) range, while taller buildings or those located in coastal areas may easily see over 100 psf (4.788 Pa) of negative wind pressure.
Some installations are so bad that they do not need any testing. If the substrate is visible through gaps and voids, it’s a good indication that air would not stop just because your contractor said so. The prerequisite of all testing is to fix all conspicuous deficiencies first. Inexplicably, we would be asked to test them anyway.
Also, some building walls are built either without any dedicated weather resistive barrier (WRB) or they confusingly have two or more layers. The former is typical for thick concrete walls, which designers often believe that their thickness is a sufficient weather defense (as in the photo below, where heavy leaks were observed inside). Testing these walls may need a different technique, as the air pulled at such a crack can and probably comes from the adjacent crack, along the line of least resistance.
Tips and Tricks of The Trade. What is in your wall and roof and how to test it on your kitchen table? Best things in life are free. Kaz shares these tricks with designers and owners who are often unable to obtain physical characteristics of samples of brand new materials they consider using. In many cases all you need is a cup of hot beverage.
This material republished here is brought to you by Building Enclosure Institute, the Florida Non Profit Corporation.
 3D Thermal Modeling
 Condensation Risk Assessment
 Facade Access
 Facade Engineering. How To Design a Functional Building Enclosure
 Facade Impact Resistance Manual
 Foggy Glass Disease
 How To Write and Read a Forensic Report
 In Support of Glazed Curtain Walls
 Movements and Tolerances
 Review of Curtain Walls, Focusing on Design Problems and Solutions
 Transitions: How to Design Facade Interfaces
 When You Need A Window – Solar Design